Sunday, June 23, 2013

Fried Chicken and Flaky Biscuits

I did my undergrad in Virginia. When I think of the South, I think of patriotic parades, kind smiles, and lots of bugs.

But the food! Oh man, the food is one of the best things about the South. It may be the death of you, but the taste experience is like heaven on earth.

Yeah, I’m kind of encouraging unhealthy eating right now. Let me make up for it:
 
Kids, eat your vegetables!
And no, onion rings and zucchini fries don’t count!

But seriously, down home Southern food is amazing. And as long as you only eat its wheelbarrow-full of calories occasionally, I don’t feel bad encouraging a little grease consumption. James Weldon Johnson, author of The Autobiography of an Ex-Colored Man, seems to agree.

In his deceptively fictional “autobiography,” Weldon illustrates the hypocrisy of racism in the United States. His short novella is packed with wit, culture, and hard-hitting truths. It’s a must-read, in my opinion.
During the narrator’s journey to figure out his own identity as one who straddles the white and colored world, he finds his way to a home-cooked Southern breakfast.

“And the breakfast, simple as it was, I could not have had at any restaurant in Atlanta at any price. There was fried chicken, as it is fried only in the South, hominy boiled to the consistency where it could be eaten with a fork, and biscuits so light and flaky that a fellow with any appetite at all would have no difficulty disposing of eight or ten. When I had finished I felt that I had experienced a realization of, at least, one of my dreams of Southern life.” (Johnson 27)

I start to drool every time I read that passage. Oh my yum! It also makes me a bit nostalgic.
In order to slake my longing for the Blue Ridge Mountains, I decided to fry up this meal. Although, sorry, I didn’t eat it for breakfast.

Fried Chicken


Chicken pieces (1 whole chicken, cut into manageable pieces (2-3 inches in diameter) **Tip: use scissors**)
1 tbsp salt
½ tsp pepper
¼ tsp paprika
¼ tsp basil
¼ tsp garlic powder

Place all ingredients in a plastic bag, and shake/massage to mix. Let sit for 15 minutes. While the chicken is saturating the spices, do the other steps below.

3 eggs
1/3 cup water

Put ingredients in a medium bowl. Whisk until yolk and white are integrated.
2 cups flour
1 tbsp paprika
1 ½ tsp pepper
1 tsp salt
½ tsp garlic powder
¼ tsp cayenne pepper
Combine all ingredients in a medium bowl.

Cover the bottom of a heavy-bottomed skillet (we used cast iron) with ¼ inch of oil (we used Canola). Heat on medium high heat until a pinch of flour starts to sizzle when dropped in the hot oil (but not so hot that the pan is smoking). Remember when working with hot oil, always have a metal pan lid and baking soda close by in case of a grease fire.

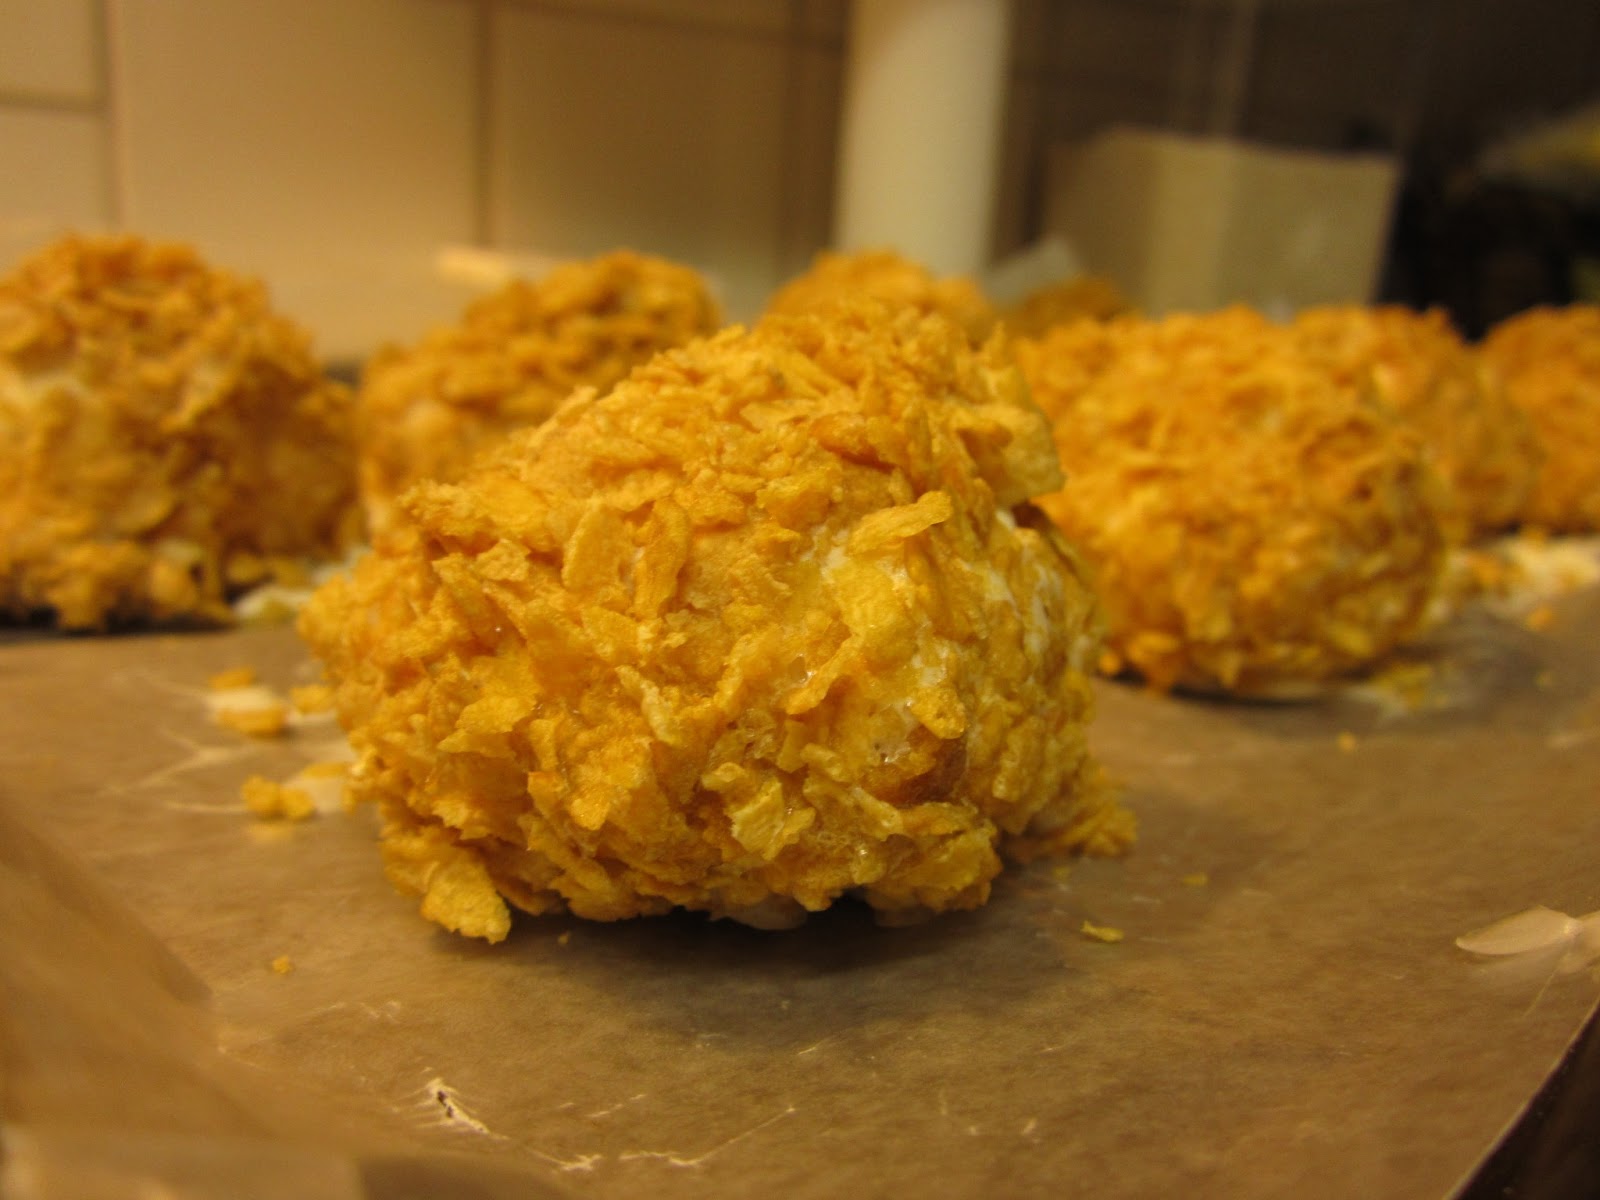
Place chicken pieces in a gallon plastic bag with flour mixture and shake until thoroughly coated. Add chicken to hot pan and fry for about five minutes on 1 side, then rotate and fry for 5 minutes.  Repeat this process until the chicken is golden brown (should take about 20 minutes total).  You can also cut a piece of chicken to see if it is no longer pink.
Battered up!

Frying
Take care to make sure the oil is hot enough to cook the chicken, but not so hot that it burns it.
Use tongs to remove chicken from pan. Place on a rack over a cookie sheet or broiling pan for the excess oil to drain. Add more salt and pepper to taste, if desired.

My friend Lori helped me out with cooking the chicken, since she’s more experienced at it. Check out this beautiful chef!


This is some of the best fried chicken I’ve ever had. No joke. I think soaking the uncooked chicken in the spices made all the difference.

And don’t forget about the biscuits! Holy cricket, they’re amazing!
 
Flaky Biscuits
adapted from southern.food.com

These babies 100% live up to the description, “biscuits so light and flaky that a fellow with any appetite at all would have no difficulty disposing of eight or ten” (Johnson 27).
Recipe:
  • 2 cups all-purpose flour
  • 1 tablespoon baking powder
  • 1 teaspoon salt
**Note: You can use 2 cups Biquick instead of the above 3 ingredients, if you prefer. I used my homemade bisquick.**
  • 8 tablespoons butter, very cold
  • about 1 cup buttermilk
    Preheat your oven to 450°F.
    Combine the dry ingredients in a bowl. Cut the butter into ¼ inch chunks and cut in to the flour until it resembles course meal. Add the buttermilk and mix JUST until combined. If it appears on the dry side, add a bit more buttermilk. It should be very wet.
** I didn't have buttermilk, so I used this handy buttermilk substitute. Works like a charm every time.**
    Turn the dough out onto a floured board. Gently, gently PAT (do NOT roll with a rolling pin) the dough out until it's about 1/2" thick. Fold the dough about 5 times, gently press the dough down to 1 inch thick.  Don't go too thin or the biscuits won't be moist.  Also, be careful not to handle the dough too much -- you don't want all that butter to melt.
    Use a round cutter or the top of a drinking glass to cut into rounds. You can gently knead the scraps together and make a few more, but they will not be anywhere near as good as the first ones.
    Place the biscuits on a cookie sheet- if you like soft sides, put them touching each other. If you like"crusty" sides, put them about 1 inch apart- these will not rise as high as the biscuits put close together.
    Bake for about 10-12 minutes- the biscuits will be a beautiful light golden brown on top and bottom. Do not over-bake.
These are the best homemade biscuits I’ve tried or made. I’ve made this recipe multiple times, and the key to their deliciousness = butter. Don’t go halfway on these babies, or they won’t be any good (so NO margarine, shortening or lessening the proportion of fat). The more butter, the better.

I made the hominy, too, but I didn’t really do it right. I think the hominy James Weldon Johnson is describing is hominy grits (“hominy boiled to the consistency where it could be eaten with a fork”), which comes out to be more like a hot cereal, from what I understand. The only hominy I have access to in California, though (at least at normal grocery stores), is canned hominy. It’s kinda gross – like undercooked and oversized corn kernels. I did my best to boil it as described, and added a little salt and pepper, but I consider it a failure. It just tasted like canned hominy, in the end. So… let’s just remember how awesome the chicken and biscuits were and move on.

Yeah, this meal is unhealthy.  But my mantra when it comes to food is “everything in moderation.” Once in a while, you just need some Southern comfort food. 


Thursday, June 13, 2013

Fried Ice Cream


I am not into the sappy romances. Every time I watch a romantic comedy, and it comes to the cutesy ending scene, I get all squirmy and hide under a blanket until it’s over.

Really mature, I know.
 
For this reason, I’m not Nicholas Sparks’ biggest fan. I don’t have anything against him, but I have a hard time controlling my scoffs and eye-rolls during his books and movies when things get cheesy (which is often).

However, Sparks’ book Safe Haven (which is also a movie that came out this year) caught my attention because it mentions Fried Ice Cream. And I really wanted to make fried ice cream.


When the couple is talking about going to a local carnival (which in the movie is changed to a parade), the dashing male love interest, Alex, says to the mysterious, beautiful out-of-towner, Katie,
 
“‘And if you ask me nice, I’ll treat you to some deep-fried ice cream.’
“‘Fried ice cream? It sounds disgusting.’
“‘It’s actually tasty.’”

(I forgot to write down the page number before I went out of the country, but it’s toward the end of the book, before the climax.)

Yeah, that’s not a very big role that my little treat plays, but like I said, I really wanted to make fried ice cream.

“But fried ice cream?” you ask.  “Come on, that isn’t possible.”

Actually, it is. And it’s super easy. And delicious.

For the recipe, I just followed this video:


But if you want it written out, here’s the recipe. It looks way more complicated than it really is, I promise.

Fried Ice Cream

Ingredients:
1 quart Vanilla ice cream
3 cups Cornflakes
4 Egg whites (the video says 3 -- I needed more)
Oil for frying

Suggested toppings:
Honey
Whipped cream
Cinnamon
maraschino cherries
  1. Line a cookie sheet with waxed paper. Place 8 scoops of ice cream on the waxed paper. Place in freezer and freeze for 1 hour.
  2. Place cornflakes in a gallon ziplock bag and roll over them with a rolling pin until mostly crushed, but not powder. Pour into a medium bowl. Mix egg whites and water in a bowl until combined.
  3. Remove ice cream balls from freezer. Moving quickly, pick up each ball of ice cream and roll it in the egg whites until completely covered. Then roll in the corn flakes. You may do this process twice if you want a crispier outer shell for your fried ice cream (recommended!). When all of the ice cream balls are coated, return to the freezer immediately. Freeze for 3 hours, to make sure the ice cream gets very hard. Otherwise it will turn into a puddle when it is fried!
  4. When the 3 hours are up, heat about an inch of oil in a pan (the video says 4 inches -- you don't need that much!). You don’t want your oil to be crazy-hot. I waited until I could see the oil start to get swirly – not quite boiling, but definitely moving. Drop a drop or two of water in the oil – If it immediately bubbles, the oil is ready.
  5. Only remove your ice cream from the freezer as-needed. I chose to fry the ice cream one at a time to be safe. Keep the rest in the freezer because, duh, it’s ice cream, and you don’t want it to melt.
  6. Drop an ice cream ball into the oil and use a slotted spoon to turn it over in the oil so it cooks on all sides. The corn flakes will turn slightly darker brown and will feel crisper. Remove from the oil after 30 seconds.  Don’t go much longer, or it won’t be ice cream anymore!
  7. Place ice cream in a bed of paper towels and blot a little to remove excess oil. Then place in serving dish. Top with a swirl of honey, a dollop of whipped cream, a couple shakes of cinnamon, and a cherry.  Then you are free to enjoy this hot-and-cold, sweet-and-salty treat!

Before freezing the second time

Frying!

It sounds complicated written out, but I promise it’s not. Just watch video like I did and you’ll be fine.

A cool thing about this treat is that once you freeze the ice cream with the egg whites and cornflakes on them, you can keep them in the freezer and pull out an ice cream ball to fry whenever you want! Perfect for serving at small parties when you want to show off!

Saturday, June 8, 2013

Finnish Food: Lihamakaronilaatikko

As I mentioned in my previous post, I'm in Finland! 

Since I've been here, I've had the opportunity to talk to several native Finns, including a woman whose amazing cooking skills I witnessed firsthand. 

I asked this woman (We'll call her Mrs. V, since it's illegal in Finland to put people's personal information online without permission, including names) what she would say is the quintessential Finnish food that she would recommend to a foreigner.  Mrs. V said that if you go to a restaurant, the most classic dish is one from Lapland (way northern Finland, up in the Arctic Circle), and it is reindeer meat served with mashed potatoes and lingonberries (I will be trying this asap!).  But for the kinds of foods Finns eat at home, the most classic dish is "a macaroni casserole with meat and egg-milk, baked."

This bit about the macaroni casserole intrigued me, because before I came to Finland I was reading a Finnish children's book called Moominsummer Madness, which is the 4th book in the very popular Moomin series by Tove Jansson (it's also a comic strip).  The series is very uniquely illustrated, and has a beautiful flavor of childhood in a fantastical Finnish forest.  It's also really funny, in a British sort of way, but different, if that makes sense.  It's just a great series, reminiscent of Winnie the Pooh, and I will definitely be reading it to my future kids.


In Moominsummer Madness, the characters' home is flooded.  Instead of despairing, though, the young male character, Moomintroll (who is illustrated to look kind of like a hippo, as are his parents), decides to swim down into the pantry for breakfast ...with his parents' permission, of course. 

"Inside," Jansson describes, "the water was white with milk, with a few specks of loganberry jam thrown in.  A couple loaves of bread passed him slowly, followed by a school of macaroni" (24).
The image of a "school of macaroni," like fish, floating through a flooded pantry, really stuck with me.  It's just a cool image.  But I also wondered why on earth such a quintessentially Finnish book would have macaroni, an Italian noodle, featured in it.

But after talking with Mrs. V, it made sense.  The beef-and-macaroni casserole that she described (called "Lihamakaronilaatikko") is one of the most classic Finnish foods you can eat, something that the majority of native Finns eat at home regularly. 

I decided to try macaroni casserole in Finland at the first opportunity, in the spirit of the Moomin series.  I spotted it quickly during my visit to a local Prisma (which is like a super-duper Walmart -- meaning bigger and better), and bought a package.  It was just as Mrs. V described!  And it was quite good, although a tad bland.  Apparently, though, most Finns eat it with ketchup to spice it up a bit.

I looked at the ingredients carefully (after translating them to English) and then searched for a recipe for you guys.  This recipe below is almost exactly what I ate.  It's a very simple dish, and apparently a huge hit with Finnish kids who aren't big fans of strong flavors.  Try it with your kids!

It looks a little gross, but I promise that it's good!
Lihamakaronilaatikko
Adapted and adjusted to English measurements from Foodprint.eu

2 cups macaroni
6 1/4 cups water 
2 beef bouillon cubes (or equivalent as directed on packaging - about 2 tbsp.)
2/3 lb ground beef 
1 onion
1/2 tsp salt
1 tsp black pepper
parmesan cheese
 
"Egg-milk"                                      
3 eggs
3 cups milk 
1 tsp salt
1/4 tsp white pepper 
 
Boil the macaroni in beef broth (water with bouillon cubes) until almost cooked, drain. Chop the onion into fine pieces. Add the ground beef and onion to a saucepan and allow them to brown. Season with salt and pepper. Mix the macaroni and beef together and then pour into a greased oven casserole. Mix together the eggs, milk, salt, pepper and pour over the macaroni-beef mixture. Sprinkle top with parmesan cheese and add a few pats of butter on the surface. Cook at 350 F for approximately 1 hour.  Serve with ketchup
 
 Here is a bunch of Moomin paraphernalia I spotted in Prisma.  I was really excited that I knew what it was.  Obviously, that series is quite popular here.

Wednesday, June 5, 2013

French Flan with Sugared Almonds


Sometimes you just have to feature the classics. Today, that classic is Madame Bovary, by Gustave Flaubert, which takes place in semi-rural 19th century France.

Most of the time when I blog about food from a particular book, it means that I like the book. Not in this case. In fact, I quite detest this book.
 
*Gasp!*  A girl with an English degree who hates Madame Bovary?  How could I?

The real question is, how could I not? This story is all about an extremely selfish woman who has a great life and completely ruins it because she is greedy, envious, lustful, immature, and whiny. She is a sad excuse for a woman, and it makes me angry that she has become a pinnacle character in western literature.

Of course, the writing is beautiful, and the characterization is amazing.   But I can’t like a book when I hate the main character.

The thing with Madame Bovary, though, is that the food plays an essential role in the progression (or regression) of the title character. You see, Emma Bovary’s life falls into a negative spiral because she experiences little tastes of luxury, and wants more and more until she is incapable of being happy. Her first taste of luxuriousness was at her wedding, where her family served her and Charles (the groom) a beautiful French feast.
 
Enter French Flan. Gustave Flaubert describes it through Emma and Charles’ eyes, who have never experienced such extravagant food:
 
“Big plates of yellow custard shuddered at the slightest bump of the table; they had the initials of the newlyweds traced on their smooth surfaces in arabesques of sugared almonds” (24-25).
 
Now, flan has a bad rap here in America because of Mexican flan. Mexicans do so many foods right, but flan is not one of them. Yellow Jello? No thanks.

If you don’t know, flan is simply a thick, mostly solid custard, just like Flaubert described. But instead of using gelatin to get that consistency, the French do it the right way – with lots of eggs, and some sort of thickener. I used cornstarch, but the more historically accurate way would have been with flour. I normally would use the more historically accurate method, but I was pressed for time preparing for a sudden and long trip to Finland, and I didn’t do enough research. Sorry! For a more true-to-the-times recipe, click here.

Here is the recipe I used, below. It was thick, rich, and very luxurious.  As a side note, I chose a crustless recipe on purpose.  This is because Flaubert describes that the yellow custard "shuddered" (a.k.a. jiggled).  I didn't see this happening with a crust to hold its shape.  That's the main reason I chose this recipe.

French Flan
View original recipe at Cooking with Corinne

2 cups milk
1/2 cup liquid cream
1/2 cup granulated sugar
5 egg yolks
3 1/2 tbsp cornstarch

In a large saucepan, add first the dry ingredients starting by cornstarch and sugar. Stir to combine. Add the egg yolks and combine until you get a smooth mixture. Add the cream and the milk at the end. 
Place the saucepan on the stove, and bring the mixture to a boil over low heat while stirring constantly. Cook the mixture for about 10 minutes while keeping stirring.
Cover the bottom of a springform pan with parchment paper. Butter and flour the sides.
Pour the mixture in the pan. Reserve at least one hour in the fridge.
Preheat oven to 340°F and bake for 15 minutes.
Leave a room temperature to cold. Unstick the sides with a knife and remove the flan from the spring-form pan. Serve cold.

Before heating

Heated for 10 minutes after boiling.  See how it's thick enough to leave lines in the custard?
Baked

Confessions time: I cheated and used butter + milk instead of cream, since I didn't have any on hand.  I also didn't use a springform pan -- I just used a regular 8" round cake pan.  Even with these cheats, everything turned out fine.

For the sugared almonds tracing the couple's initials, I should have used this recipe, but again, I was in a hurry and only did cursory research.  So here's what I actually did, below.  I also used almond slices instead of whole almonds, which I later crushed to make them easier to work with.

Sugared Almonds
View original recipe here
  • 1 cup whole blanched almonds
  • 1/2 cup sugar
  • 2 tablespoons butter
  • 1/2 teaspoon vanilla extract
  • 3/4 teaspoon salt
Heat almonds, sugar and butter in a heavy skillet over medium heat. Cook, stirring constantly, until almonds are toasted and sugar is a golden brown, about 15 minutes. Stir in vanilla. Spread on aluminum foil; sprinkle with salt. Cool and break into clusters.
 
I kind of botched my sugared almonds by letting them cook too long. As soon as they barely start turning brown, get them off the burner! They’ll keep cooking (and quickly) even after you remove it from the heat).
 
When I should have removed it from the heat.  See how it's just barely starting to get brown on some of the sides?
When I actually removed it from the heat.  It got here in about 1 minute.  It cooks fast!
sugared almonds, cooled and crushed
I crushed my almonds with a rolling pin once they were cool and used the crumbs to monogram Charles and Emma Bovary’s initials onto the custard, as described. The sugar will start to dissolve on the damp custard, so you have to be very careful not to mess up. Either that or create a stencil, which is what I should have done.
 
 
I ate the E first, because I dislike Emma so much and think she ruins everything she’s a part of.  But the flan tasted fabulous!

Monday, May 27, 2013

Chocolate Cake


Aaaaaand we’re back!  Julie is home from Denmark and I (Mary) am on summer break, which means we have time to reignite the foodie flame! 

It’s been way too long, but we’re going to come in strong with a bunch of new posts.  I have a bunch of books to read for my MFA program this summer, and that means a bunch of food to cook from them!

I’m going to start out with a classic dessert: Chocolate Cake.  But don’t turn away just yet!  Everyone who tried this recipe told me it was the best chocolate cake they’ve ever had.  It’s moist, but light, and chocolatey, but not cloying. 

I found chocolate cake in a New York Times bestselling Young Adult novel, Divergent, by Veronica Roth.

  
Riding the Hunger Games wave (more like tsunami), Roth's book takes place in a dystopian society with the people segregated by a controlling government.  But this is not a Hunger Games rip off – it’s actually a great book in its own right, and if you aren't a fan of the gore of Hunger Games, this is a good way to get a thrilling YA without so much blood and guts.  The 3rd book in the trilogy, Allegiant, comes out this October, and the Divergent movie comes out in 2014.

16-year-old Tris Prior lives in a post-apocalyptic Chicago, where the city is divided into 5 factions to prevent government corruption: Abnegation (for the those who believe that selflessness is the solution to corruption), Candor (for those who believe telling the truth would solve everything, Amity (for those who find kindness to be the panacea for the world), Erudite (for those who value learning and knowledge), and Dauntless (for those who value bravery as the fix).

Tris switches from Abnegation, where everyone eats really plain food because eating food that tastes good is considered self-indulgent and therefore non-abnegation, to Dauntless.  At Dauntless headquarters, Tris marvels at all the flavorful food she has never tried before.  The food she repeatedly dwells on is chocolate cake.  This is probably due to her mother’s recommendation, who tells Tris: “‘Have a piece of chocolate cake for me, all right?  The chocolate.  It’s delicious’” (Roth 187)

As I was reading the book, I was wondering what chocolate cake might taste like to someone who has never had it before.  I decided to make it to help me ponder over it. Because, you know, chocolate helps you ponder.

Confession: I normally make chocolate cake from a box.  Gasp!  I know, scandalous.  But it’s the only thing I bake from a box – I’m a total food snob** about everything else.  And lately I’ve been cooking a lot of made-from-scratch cakes, so I am going to be kicking that boxed cake mix habit to the curb.  This was a decision I made after eating this 100% homemade chocolate cake.


Chocolate Cake
Recipe from RealSimple.com

1 cup unsalted butter (2 sticks), cut into pieces, plus more for the pans
2 cups all-purpose flour, spooned and leveled
1 1/2 cups granulated sugar
3/4 cup unsweetened cocoa powder
1/2 cup dark brown sugar
1 teaspoon baking soda
1 teaspoon kosher salt
2 large eggs
1/2 cup sour cream
1 teaspoon pure vanilla extract
Creamy Chocolate Frosting

Heat oven to 350ยบ F. Butter two 8- or 9-inch round cake pans and line the bottom of each with a round of parchment paper.
In a large bowl, whisk together the flour, granulated sugar, cocoa powder, brown sugar, baking soda, and salt.
In a small saucepan, combine the butter and 1 cup water and bring to a boil (the butter will melt). Add to the flour mixture and, using an electric mixer, mix until combined. Beat in the eggs, one at a time, then the sour cream and vanilla.
Divide the batter evenly between the prepared pans. Bake until a toothpick inserted in the center of each cake comes out clean, 35 to 45 minutes. Cool in the pans for 20 minutes, then turn out onto a rack to cool completely.
Transfer one of the cakes to a platter and spread with ¾ cup of the frosting. Top with the remaining cake and spread with the remaining frosting.

Flour/cocoa mixture.  You could sift it, but I didn't and it was lump-free.
boiling water and butter

Creamy Chocolate Frosting

1 1/2 pounds (24 ounces) semisweet chocolate, chopped
1 1/2 cups unsalted butter (3 sticks), at room temperature

Melt the chocolate in a medium bowl set over (but not in) a saucepan of simmering water, stirring often, until melted. Let cool to room temperature (do not let it solidify).  [Note: I just heated the chocolate chips in a glass bowl for 30 seconds at a time, stirring between each heating, until they were melted.  Whenever I do the double boiler method explained above, I end up getting a tiny splash of water in the chocolate to seize and become useless.  It's infuriating!  The microwave is foolproof for me]

Using an electric mixer, beat the butter until creamy. With the mixer running, slowly add the chocolate and beat until combined and smooth


Chocolate almost completely melted, before letting it cool and adding it to the butter


There you have it!  It was so completely delicious.  I will be making chocolate cake using this recipe from now on.  I love how simple yet delicious it is!


**Side note: While some people may think it’s bad to be a food snob, they never complain when I make stuff from scratch with real ingredients.  Basically, being a food snob is a good thing.  And because I’m a food snob, you should know that when I say a recipe is good, it’s truly good.